To be able to clip through a wall or door you need bomuhey skew and perform three additional steps. Bomuhey skew lets you face towards or away from the screen and in the first step you adjust this rotation of Samus in a way that lets you clip into a wall. In the second step, you use the angle from the first step to partially clip. You can get about half a tile inside a wall before the out of bounds detection kills Samus. The third step is required to survive clipping completely to the other side of the wall.
All of the setups on this page are explained again in the tutorial videos by Arkandy at the bottom of the page!
¶ Execution
There are generally three types of walls we differentiate when it comes to clipping. Hard collision walls, soft collision walls, and doors. Doors with some kind of cover can only be clipped if the cover is on the other side. Depending on the type of wall you want to clip, you have to choose a different setup. Of course, there are some special cases, which are mentioned in a special cases section.
¶ Wall Clip Angle Setups
For most of these setups only the first and second step of the wall clip are included in the description, setups for the third step are in the next section.
¶ Magnets
Magnet setups are the easiest and fastest setups. However, they are limited by the presence of a ceiling magnet near the clipping location (and having the grapple beam). There are multiple setups to get a wall clip angle with the help of a ceiling magnet, here is one of the most used setups.
Stand below a ceiling magnet while facing away from the screen and use a grapple shot to pull Samus onto the ceiling magnet. As soon as you grab the magnet jump off by pushing the control stick to the side and pressing jump. It is important not to use free aim during the setup. The distance from the magnet when the grapple shot first connects determines the resulting angle. In general, a closer distance results in a bigger angle, except for very small distances. The distance can be changed by simply jumping before firing a grapple shot. This setup will result in a wall clip angle to the left, but you can get a wall clip angle to the right by facing the screen at the start of the setup or by aiming behind you and letting go of free aim to turn Samus around at the end of the setup.
To start clipping with a magnet setup, position next to the door and do two or three dash melees away from the door before starting a speed boost towards the door. Another method includes crouching, starting a speed boost away from the door and immediately starting a speed boost towards the door. For very small angles you can also use the method for the tornado setup.
Works on:
- Hard collision walls
- Soft collision walls
- Doors
magnet_setup.mp4
¶ Tornadoes
To do "tornadoes" flick your control stick left and right repeatedly, turning Samus around with each flick. This will slightly adjust the rotation value of Samus and when getting a forward or backward skew after doing turnarounds, this new angle will allow you to clip. In general, more turnarounds mean a faster clipping angle, but because it also takes time to do a lot of turnarounds, doing around 80 turnarounds (one turnaround consisting of moving the control stick to the left and the right once each) is considered optimal. The exact number depends on how fast you can perform turnarounds and how far you need to clip inside the wall.
To start clipping with the tornado setup, it is enough to position yourself directly next to the door and move the control stick away from the door until Samus starts walking. Then quickly move the control stick towards the door again and start a speed boost to accelerate the clipping process.
Unfortunately, if you fail to get the right skew angle or you get a Hobbit skew, you have to reset the skew and do that ALL again. All actions that reset the skew, no matter if you are skewed or not, will reset the turnaround value. However, there is a backup method that uses skew chains.
Works on:
- Hard collision walls
- Soft collision walls
- Doors
tornado_setup.mp4
¶ Left Side Clip
The left side clip setup is not only one of the fastest and easiest setups, but it also works for a lot of required wall clips in runs. But just as the name suggests, it only works on walls to your left and there is only a very small number of left walls that can't be clipped with this setup.
The first step of the setup consists of resetting your angle and facing right. This can be done by for example flash shifting or aiming behind you and meleeing, but the easiest way is to morph and then unmorph facing right, away from the wall. In the next step, you want to either crouch or slide and get a backward perfect skew while crouched/ sliding. With this angle jump against the wall and slide away from it. End the slide by tapping free aim (do not hold the button down). Then turn around by aiming behind you and do dash melees away from the wall. With each dash melee, you get further into the wall. Using the phantom cloak during the dash melee animation moves you farther into the wall than a regular dash melee.
Works on:
- Hard collision walls
- Soft collision walls
- Doors
left_side_clip.mp4
- The fastest way to clip is by alternating regular melees and cloaked dash melees.
- For doors, one regular and one cloaked dash melee is enough clip distance
- Let the dash melee animation finish to get the maximum distance out of each melee
- When unskewing from a left clip, you will be facing towards the collision and must turn around before grapple walking through the soft collision. To make this easier and prevent popping out of the wall, buffer the turnaround during your unskew and use an additional standing melee to buffer your grapple walk.
There are some circumstances that require minor modifications to the left clip set up in order to clip, these are known as modified left side clips:
- To clip into flippers such as the one in Artaria or Ghavoran, you must clear your turnarounds by morphing and unmorphing facing towards the flipper, crouching, turning around once while crouched then performing a perfect skew and following the remaining instructions for a left side clip. This method also applies to Neutral Jump Clips + Spark used to clip to the right.
- In 1-Tile wide tunnels, you can clear your turnarounds with a morph then unmorph facing away from the direction you want to clip (right in this case), press free aim, crouch and then perform a crouched perfect skew to achieve an angle which allows you to left clip as normal.
¶ Mini Tornados
To do the mini tornado setup you have to reset your angle first, for example by morphing. Then do 16 crouched turnarounds (one turnaround is a 360-degree turn) and stand up again. Get a backward perfect skew and jump against the wall. Walk 12 steps (away) from the wall, and then do 1 regular and 1 cloaked dash melee.
Works on:
- Hard collision walls
- Soft collision walls
- Doors
mini_tornados.mp4
- This explanation of the mini tornado setup only covers clipping to your right. It works for left clips as well, if you get a forward-facing angle instead, but in this case, you want to use the left clip setup most of the time.
- Let the dash melee animation finish to get the maximum distance out of each melee
- The number of turnarounds, steps, and dash melees can be increased if you are having trouble getting the setup consistently.
¶ Neutral Jump Clip
The regular neutral jump clip setup can be used to clip doors that don't kill you or to clip soft collisions with invincibility very fast. First, reset your angle by morphing and then unmorph facing away from the wall. In the next step, you want to either crouch or slide and get a backward/forward perfect skew while crouched/ sliding (backward for left clips, forward for right clips). With this angle jump against the wall and slide away from it. End the slide by tapping free aim. It is crucial for the setup to not keep holding free aim and to let the stand-up animation finish. This is even more important if you combine the setup with a spark. To clip you want to do a neutral jump towards the wall. You have to move inside the wall at the start of the jump, if you talk too long to move, you will not clip. To make this part a bit easier you can use the phantom cloak and move toward the wall before even jumping. Usually, this would result in a spin jump, but the phantom cloak prevents you from spin jumping.
Works on:
- Hard collision walls
- Soft collision walls
- Doors (only if the door does not kill you for being out of bounds)
njc.mp4
¶ Neutral Jump Clip + Spark
While the regular neutral jump clip setup is very situational, the spark setup can be used on most walls, but not doors. The start of the setup is the same until you stand up from the slide. You want to then charge a speedboost and store a shinespark. Now you have two options.
The first one is to unskew, do a double turnaround and hold free aim. It is easy to accidentally clip out of the wall while doing the turnaround, in which case you have to do the setup again. Jump while holding free aim and right on the control stick and release free aim to move into the wall. Release to control stick as soon as possible and activate a shinespark before you are too deep inside the wall. The shorter you have the control stick right after releasing free aim, the more time you have to activate the spark. This setup is tight timings and you can use pause buffering to make it easier.
The second option is even harder and it is highly recommended to use pause buffering for the second method. Once you stored the shinespark, unskew, hold free aim, the control stick into the wall and jump. Pause during the first frames of the jump, and let go of free aim. Continue holding into the wall and unpause for one or two frames to get inside the wall. Finally, let go of the control stick, unpause again with + and press B to spark.
Works on:
- Hard collision walls
- Soft collision walls
- Doors (only in combination with a map buffer spark; only recommended if using the grapple beam is not an option)
embed
- If you are using a pause buffer setup, you can exit the last pause with a map buffer to make to timing to activate the spark much easier because it stalls your forward momentum and lets you buffer the activation. This way you also have more control over the height at which you activate the spark by allowing you to fall before sparking.
- If you hold freeaim out of the map buffer and press, release then hold B and press + you can do three sequential map buffers to buffer a spark through terrain to cover up to 6 tiles of distance. You must hold your spark direction out of the first map buffer.
- If you do a 1 frame pause buffer after the 1st map buffer but before the 3rd, you can extend your total clip distance to 7 tiles.
- You can perform a Neutral Jump Clip + Spark in a 1-tile wide tunnel by following the same set up as the modified left clip, but facing the opposite direction. See Fast Ferenia Clips below for an example.
¶ DLC Setup
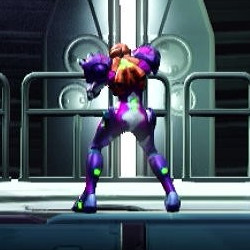
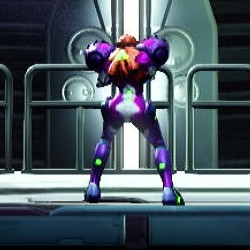
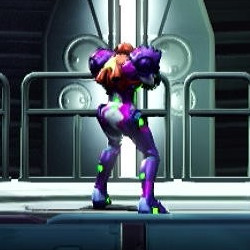
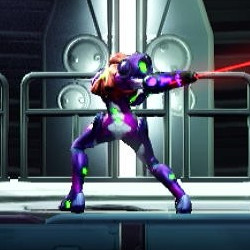
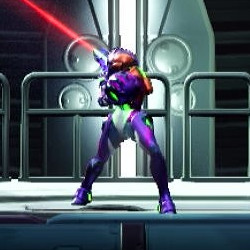
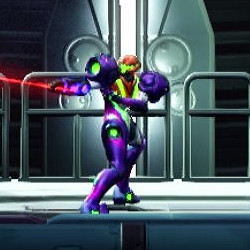
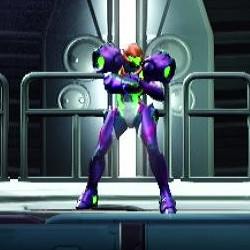
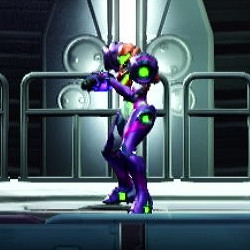
This setup uses skew chains, which are explained in more detail at the end of the execution section. It starts with a jump on the second frame of turning around after running left, which results in Samus facing backward and slightly to the left. The next jump is on frame 3, resulting in Samus still facing backward, but now to the right instead of left. The last jump is on frame 6, which results in Samus facing the screen. You can check if you got the correct angle if your shots go the right and Samus very slightly moves to the right when running. This last jump can also be made easier with a map buffer
Works on:
- Hard collision walls
- Soft collision walls
- Doors
dlc_setup.mp4
¶ Ledge-drop Setup
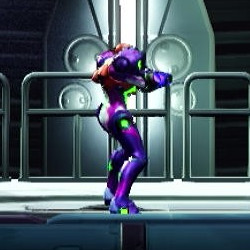
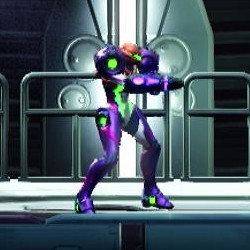
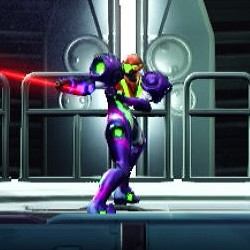
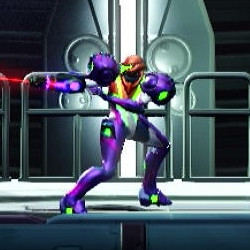
This setup requires a ledge to your right and uses skew chains, which are explained in more detail at the end of the execution section. To get the first angle you need to hang at the ledge and let go of it by pressing down on the control stick. Pressing jump immediately after letting go of the ledge results in a skew angle. You get different angles depending on the timing, but for this setup, a jump at frame 5 after letting go is required. This will result in an angle that is close to facing completely to the right, but Samus still faces slightly backward. Followed by a skew jump on frame 5 again which results in Samus facing the screen with a wall clip angle to clip walls to the left.
Works on:
- Hard collision walls
- Soft collision walls
- Doors
ledge_drop_setup.mp4
¶ Water Skew
When doing skew jumps in the water (without the gravity suit) you will get different angles. The angles that look like they are perfectly backward or forward-facing are wall clip angles when done underwater. However, because mantling a ledge removes the skew angle, you need to get out of the water without mantling. That is why it is required for most water skew setups to get a shinespark before going into the water to be able to get out of the water with the skew angle again. You have about 2-3 tries to get the correct angle before the spark timer runs out.
Works on:
- Hard collision walls
- Soft collision walls
- Doors
water_skew_blue_tp.mp4
¶ Hobbit Skew
Each time you do a skew jump there is a chance that you get a Hobbit skew. This means that your angle gets a slight offset of what it should be. Most of the time you do not want this to happen when doing other wall clip angle setups because this most likely alters your angle enough to not be able to wall clip with it anymore. However, if you get a hobbit skew on a perfectly backward or forward-facing skew angle it will result in a wall clip angle. A Hobbit skew is more likely to happen when there is more lag, which is dependent on the current room for example. An easy way to increase the chances of getting one is to pause buffer the skew jump.
Works on:
- Hard collision walls
- Soft collision walls
- Doors
hobbit_skew.mp4
To clip inside walls you can not start directly at the wall. You need to position slightly away from the wall and start a speed boost. For wide angles, you might get stuck at the wall and lose your speed boost. But since you need a spark for the third step, you need to keep the speed boost while clipping. You can however use a map buffer to start a speedboost right at the wall. Another method that avoids this problem is to store a shinespark right next to the wall and then perform dash melees away from the wall. This will still move you toward the wall, but dash meleeing toward the wall might not work. If you store right at the wall you have time for five dash melees and then unskewing before the spark timer runs out. But most setups only require three or four melees. An example of this can be seen in the video for the water skew setup.
¶ Surviving Out Of Bounds
There are three methods to avoid dying out of bounds that are used in the third and final step of wall clipping. However, some doors do not kill Samus and you can freely move around in them once you are clipped in, for example, regular doors or closed emmi doors. For those doors, it is recommended to use a neutral jump clip. In general, you want to use a shinespark for walls and grapple beam for soft collision and doors. A map buffer can be used for single-tile walls.
¶ Shinespark
First, store a shinespark (while in the wall), hold free aim, aim behind you, and melee to unskew. Then spark into the wall to fully clip through.
Because a shinespark lets Samus move very fast during the first frame of the spark, Samus moves about two tiles within that single frame. When you are already partially clipped inside a wall and activate a shinespark in the direction of the wall, you will be on the other side of the wall on this first frame of movement. Because of that, Samus is technically never considered out of bounds. This method can be used to clip through single and two-tile walls, doors however are three tiles wide and therefore do not work with this setup. For single-tile walls, it is enough to get only a small bit inside the wall. The Samus icon on the map is one visual cue that can be used to tell the correct distance.
For two-tile walls, you have to already be very close to dying out of bounds before you can spark.
After unskewing inside the wall you can hold free aim to jump instead of doing a shinespark and then let go of free aim to be able to shinespark from a higher position inside the wall. This is necessary for certain wall clips like the power bomb wall clip.
In this image, you can see the maximum distance you can get inside a wall before dying to the out of bounds detection. The icon is about half inside the wall.
![]()
- For single-tile walls, a diagonal spark works as well.
- After unskewing you will pop out of the wall again if you do not jump or shinespark in time.
- Depending on the clipping setup, the shinespark can be stored before clipping into the wall or it has to be stored while you are already inside the wall.
¶ Grapple Beam
Aim backward and melee to unskew (just like in the previous method). During the counter animation, fire a grapple beam into the door which you want to clip and walk through the door. That means if you want to clip through a door to your right you have to just hold right and fire a grapple beam as soon as you unskew. This can be referred to as Grapple Walking.
This method can be used to clip through up to three tiles of soft collision and is therefore mostly used to clip through doors. However, there is a variation of this setup that will allow you to clip through single-tile walls.
- Make sure not to let go of free aim too early to avoid performing a dash melee when trying to unskew.
- Your grapple shot needs enough room to travel on the other side of the wall. This means if there is a wall or ledge near the door on the other side you might need to shoot your grapple at an angle to gain enough time to clip or the setup might not work at all.
¶ Map Buffer
By utilizing a map buffer you can clip 1-tile walls.
map_buffer_clip.mp4
¶ Invincibility
With the help of invincibility, you can survive clipping soft collision without any setup. Just like with doors that do not kill you, it is recommended to use a neutral jump clip to clip as fast as possible.
¶ Special Cases
- Hyper Door
The hyper door has both the restrictions of doors, that only allow for small angles, and the restrictions of walls, that you can not start a speedboost right at the door. A left side clip works without a problem though - Flipper (from Flipper Clip)
You can simply neutral jump against the flipper to start a speedboost. - The following doors do not kill you and you can move freely around in them once you clipped:
- Regular (unlocked) doors
- Frozen (unlocked) doors
- Emmi doors
- CU doors
- Door next to the Burenia elevator in Artaria
- Top door to the left of the emmi zone in Hanubia
- Door next to the yellow teleportal in Artaria if you approach from the left and the wide cover is not loaded in
- Door at the bottom of the flash shift room in Burenia if you load from checkpoint after collecting flash shift
- Plasma cover (door) in Elun, next to plasma beam
¶ Floor/ Ceiling Clips
¶ Diagonal Spark
By partially clipping into a wall and then performing a diagonal spark up/ down towards this wall you can clip through the ceiling/ floor. This has to be done in combination with a map buffer.
¶ Phantom Slip
With the help of wall clip setups you can perform a phantom slip. A phantom slip allows you to clip up to 2-tile floors.
¶ Ceiling Clips
Similar to a phantom slip you can use wall clip setups to clip through ceilings. You can clip ceilings that are 3 to 5 tiles above the ground and you need enough space upward to downward inside the wall to shoot the grapple beam. In order to sucessfully perform a ceiling clip you have to jump out of bounds past the ceiling while shooting the grapple beam. You have to be in bounds again before the grapple shot end, but still partially clipped into the ceiling. At this point you can use a shinespark to fully clip. Can be used in combination with a map buffer. If the ceiling is only 3 tiles above the ground and only 1 tile thick you can clip with only grapple beam.
¶ Additional Wall Clip Tech
¶ Skew Chains
While being skewed and facing away from the screen (It does not have to be the perfect angle away from the screen. Any angle away from the screen works.) you can turn Samus around by 180 degrees by aiming behind you and then letting go of free aim. As mentioned in the magnet setup section this can be used to change the direction in which you want to perform the wallclip. This only works from facing away from the screen to facing the screen though. Once Samus faces the screen you cannot turn around anymore, without unskewing. You can also do a 360-degree turnaround by pressing free aim directly again after releasing it. Doing so achieves the same as doing one full turnaround during the tornado setup.
Skew chains also have another use. By jumping during the turnaround animation you can get a new angle, just like you do for getting a skew angle the normal way. That allows you to turn an angle that you got by jumping too late or too early into a correct angle or to get completely new angles that can be used to wall clip.
¶ Standing Speed Boost
While being skewed you usually can only start a speed boost in one direction, the direction you are facing. By crouching and starting a speed boost in the opposite direction Samus will start a speed boost charge, but without moving. However this speed boost will only last one frame, after that Samus will walk normally again. To be able to store a shinespark you will need to store it one this one frame. You can use a map buffer to make the timing easier.
¶ Troubleshooting and Practice
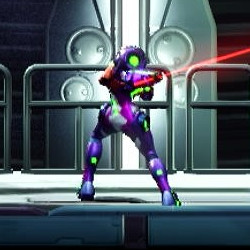
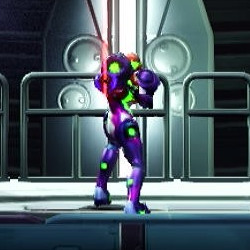
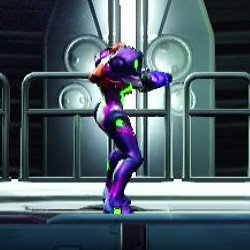
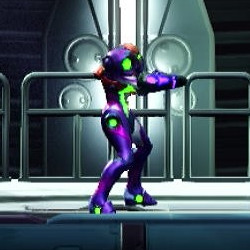
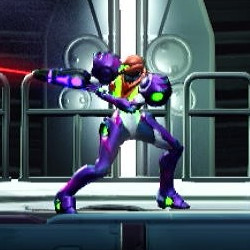
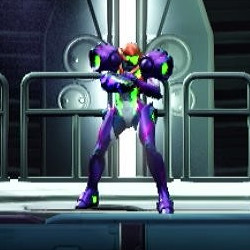
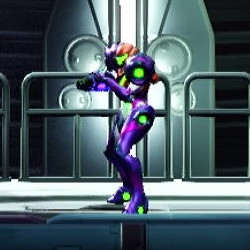
The following two tables display all the important turnaround frames for the DLC setup and the Ledge drop setup and can help identify the correct frames.
¶ DLC setup
| one frame early | correct frame | one frame late |
|---|---|---|
 |
 |
 |
| - | First skew | - |
 |
 |
 |
| - | First skew with free aim | - |
 |
 |
 |
| - | Second skew | - |
 |
 |
 |
| - | Second skew with free aim | - |
 |
 |
 |
| - | Third skew | - |
¶ Ledge-drop Setup
| one frame early | correct frame | one frame late |
|---|---|---|
 |
 |
 |
| - | First skew | - |
 |
 |
 |
| - | First skew with free aim | - |
 |
 |
 |
| - | Second skew | - |
¶ Applications
¶ Power Bomb Wall Clip
This wall clip allows you to enter the room with the red Chozo warrior without destroying the wave cover that leads into that room. It is one of the harder wall clips because you have to clip far into the wall and there is the additional risk of getting hit by one of the drones.
¶ DLC setup/ hobbit skew
By using either a DLC setup or a hobbit skew you can perform the following setup. Clipping far enough and being able to spark before the spark timer runs out can be a bit tight, especially with the DLC setup, which gives you a slightly smaller angle than a hobbit skew.
embed
¶ Hyper Door Clip
The fastest way to clip the hyper door is with a left side clip.
hyper_door_clip.mp4
¶ Storm/Screw Skip Ferenia Shortcut
A shortcut that removes the water section of the Ferenia EMMI zone in Storm or Screw Skip routing.
embed
¶ Back Door Space Jump Clips
This wall clip allows you to reach the blob in the Ferenia to Dairon Elevator room from the wrong side to back door Upper Ferenia using a left clip, unskewing while in the wall, turning away from the wall and shooting missiles at the blob off screen to pop it. A second left clip can be done to skip the 2-tile wide wall above the grapple block to grant access to the Space Jump Pool and Upper Ferenia early.
embed
¶ Fast Ferenia Clips
By performing a Neutral Jump Clip + Spark with Map Buffer, you can clip from the Ferenia Fan Room into the Emmi Tunnel and then by performing a modified Neutral Jump Clip + Spark with Map Buffer you can clip out into the Ferenia Emmi Zone.
¶ Back Door Ferenia
By performing a Magnet Skew or Neutral Jump Clip + Spark or a DLC Clip, you can map buffer spark past the Wide Beam block in front of the Dairon-Ferenia Elevator. This gives easy access to Backdoor Space Jump for Any % Unrestricted Screw Skip routing.
embed
¶ Back Door Hanubia
By performing a Neutral Jump Clip + Spark or a DLC Clip with Map Buffer, you can skip the grapple block in Hanubia that blocks lower Hanubia from the rest of the area.
embed