This guide is in a draft state and may not be complete.
¶ Introduction
Unrestricted, as the name implies, involves beating the game by any means necesary usually accompanied by the usage of heavy glitches like Bomuhey Skew and Aim Down Clip (ADC)
There are many variants of unrestricted routes, ranging from beginner friendly routes like Storm Skip Route or more difficult faster routes like Wave Skip Route and by extension Ravenbeak Skip Route
¶ General Notes
During an unrestricted speedrun, most of the changes compared to other categories usually happen after collecting Speed Booster and Grapple Beam as these allow the player to perform necesary speed tech to achieve competitive times.
If you need assistance with this, or any other Metroid Dread Speedrunning guide, please join the Discord and post a help thread in the #help-and-troubleshooting channel.
¶ The Route
¶ Artaria 1
- Proceed through the rooms normally.
- Once you enter the Melee Tutorial Room, at the top perform Proto E.M.M.I. skip and head left.
- Perform Early Cloak Pseudo Wave and head to Corpius.
- Defeat Corpius and obtain the Phantom Cloak.
¶ Charge Beam
- Exit Corpius Arena and proceed through the top Sensor Lock Door.
- Climb the room, enter the Network Station North and talk to Adam.
- Proceed through the rooms normally to the E.M.M.I. zone.
- As you're aproaching EMMI Zone Exit Northwest, slide through it then on the other side coyote jump to avoid a sized portion of slow underwater movement.
- Enter Waterfall Room
- Land on the left side ledge of the Waterfall room and perform, the usage of Phantom Cloak greatly facilitates this trick.
- Avoid the Muzby on the 2nd room by jumping over it, shoot it once to make it stop moving and have a clear, shorter jump.
- Kill the Klaida with 2 missiles then slide off the edge, then once you're past the middle ledge press the jump button to move forward, don't hold any direction on the stick.
- Enter E.M.M.I. Zone Dock Southwest.
- Slide down the slopes and proceed forward through the water.
- Kill the Dizzeans on the way with Missiles
- Destroy the Blob in the Water Reservoir room and backtrack to the Waterfall room.
- Go up through the Map Station back into the middle part of the Water Reservoir room.
- Enter E.M.M.I. Zone Dock Southwest.
¶ Charge Beam (continued)
- Perform Water Platform Skip in the E.M.M.I. Zone Hub into EMMI Zone Exit under.
- Proceed forwards into the Charge Beam room and collect Charge Beam
¶ Spider Magnet
- Circle around the same path as the start into the Invisible Corpius Room
- Go through the top Sensor Lock Door.
- Destroy the blobs blocking the way, proceed forward normally to the Thermal Device and activate it.
- Return to Network Station North and talk to Adam again.
- Proceed to the EMMI Zone through the Arbitrary Enky Room.
- Perform Magus Skip and activate White EMMI
- As the Thermal Door is opening, shoot the blob at the top, then go through the door.
- Drop down through the Flipper to the right ledge.
- As you're going down, open the Access Closed door at the top, then go through the Charge Beam Door
- Enter the Central Unit room.
- Destroy the Central Unit armor with 15 missiles, get drops from Rinkas then kill the Brain with 11 missiles.
- Exit the Central Unit room and confront White E.M.M.I.
¶ Enter Cataris
- Escape through the movable Magnet Ceiling into the room with the previously unlocked Access Closed door.
- Jump to the top of the room with the Magnet Walls, destroy the beam blocks (collect the Missile Tank if you want) and move the Magnet Wall that leads to the Early Cloak room.
- Proceed forward through the Thermal Device room into the Lower Path to Cataris.
- Damage Boost off the Plys to skip the moving ceiling magnet.
- Take the Ceiling Magnet and either kill all the Plys in the way or use Phantom Cloak to avoid them.
- Enter Transport to Cataris and take the elevator.
¶ Cataris 1
¶ Enter E.M.M.I. Zone
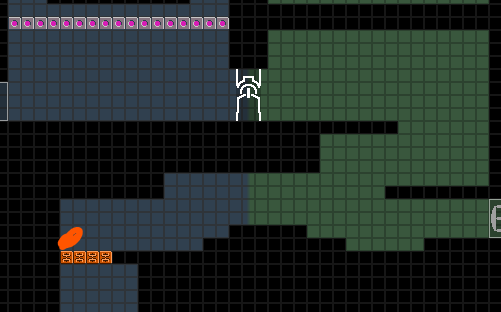
- Run left, shooting out the hidden wall blocks. Once you've removed the four, aim down-left to shrink Samus's collision just enough to avoid the Sclawk in the ceiling without stopping. Then spinfall down the rest of the room and talk to Adam.
- Head left and down, passing through the thermal door and activating the Magma Switch. Then go right, through the barrier, up and over the switch and through the trapdoor.
- In the next room, do the 5upaboost to skip an elevator cycle, then continue moving up through the room. The next ceiling magnet is not skippable.
- As you are aproaching the top door, make sure to hold an angle roughly towards 10 to 10:30 so you're able to shoot the wall blob as you're aproaching it, reducing damage taken.
- Once you're in the 2nd room, drop down (still holding left) without doing any special inputs, and as you land, dash melee to the left to kill the Ply as you go, then quickly climb up the next ledge.
- Slide off the middle ledge, then climb the right Magnet Wall first then jump to the lower ledge, this way you won't have to aim anywhere to shoot the blob and can just mash to destroy it.
- As soon as you destroy it, shoot a bit more so you open the door and go through.
- Wall Jump off the left wall to then grab the ledge into the E.M.M.I. zone.
If you did everything optimally you should be able to go through the hell run without losing any Energy Tanks.
- As you run along the top of the 5upaboost room, shoot out the blob on the far left and slide through the gap made. In the next room immediately jump after landing, then slide again.
- Keep moving left, shooting out the blocks in your way. Begin jumping up the vertical room.
- Once you're past the two lava-spewing Vulkrans, start charging your beam. Samus should pseudo-screw the enemy that comes out of the wall as you wall jump up on the right side and into the E.M.M.I. zone.
¶ First Red Button
- As you enter the room after the cutscene, locate Green E.M.M.I. using the minimap. Your goal is the door on the upper right.
- If Green E.M.M.I. is to the lower right, just run straight past it.
- If Green E.M.M.I. is on the ceiling just in front of the door, aim down and run right under it.
- If Green E.M.M.I. is in the tunnel moving into the next room, pass through the door and make sure you fall down the right side of the next room.
- If Green E.M.M.I. is just on the other side of the door, either bait it and wait (easier), or jump over it (faster).
- Once at the bottom of the next room, move up and right to just below the magma trapdoor, then begin charging your beam.
- Head up and left. Release the charge shot at the door just before coyote jumping across the gap.
- Climb the next room, head right out of the E.M.M.I. zone, and activate the Magma Switch.
- Head left back the way you came, falling down the room you just climbed as quickly as possible.
- As you move right through the door, take note of where the EMMI is.
- If Green E.M.M.I. is visible as you fall, coyote jump and take the high road to the newly opened trapdoor.
- If Green E.M.M.I. is not visible after the fall, it's in the next room. In this case, go low, triggering the EMMI's detection animation. This will give you enough time to make it through the trapdoor.
Once you exit the E.M.M.I. zone, enter the hot room and Pseudo Wave the Red Button through here in the sloped part of the ceiling. You can either pre-aim your angle before going through the door to have a better chance of getting it, or you can choose to get it on the fly, though it is very difficult.
- Once you exit the E.M.M.I. zone, head through the top door and continue right, jumping over the autclast and heading into the next room.
- Slide-cloak through the door, and begin immediately charging your beam. Either:
- Pseudo-wave the red button through the barrier, or
- Slide under the barrier, then release your charge and immediately slide back under it before the cutscene.
- Head back to the room with the now activated magnet elevator. Kill all the enemies while you wait for the magnet to come down.
¶ Second Red Button
- Start charging your beam as the magnet elevator take you up. Walljump off the elevator early and start running left.
- Jump under the Ply to the upper-left door, but just before jumping shoot your charge beam at the lower door, opening it.
- Head through the upper left door until you reach a Magma Switch. Aim up as you stand on the activation platform; this will ensure the trapdoor above opens now.
- Go back the way you came, slide-cloak through the door, fall off the edge and spin to the left to avoid the Ply. Head left through the open charge door.
- Descend the next room and head left into the E.M.M.I. zone.
- As you enter the E.M.M.I. zone, immediately jump, fall through the now-open trapdoor, and head left out of the E.M.M.I. zone again.
- Perform the ADAM Skip.
- Head to the top-left door, pseudo-screwing the Ply. Re-enter the E.M.M.I. zone.
It is very recommended to learn Adam Save Skip over choosing this route as it can lose up to a minute, and the benefits are far more superior than just avoiding taking a long way here.
- As you enter the E.M.M.I. Zone, immediately jump, fall through the now-open trapdoor, and keep descending to the bottom of the room. Head left through the door.
- Proceed forward to E.M.M.I. Zone Exit West.
- Go up the Long Mouth Statue Room into Red Teleportal Room.
- Climb Up the room with the Ceiling and Wall Magnets.
- Enter Network Station Northwest and talk to Adam.
- Proceed to the E.M.M.I. Zone Entrance West and avoid green E.M.M.I.
- Exit the E.M.M.I. Zone and the Map Station, head to the top-left door, pseudo-screwing the Ply. Re-enter the E.M.M.I. Zone.
- Move straight up, and exit the E.M.M.I. zone again at the top-right of the room.
- Run right, shoot the two Ply, then slide in and out of the firebox.
- Pseudo-screw one of the Ply on your way down into the glass tube. Head left, through the fire and the flames, and begin charging your beam. Either:
- Pseudo-wave the red button while standing in the fire, or-
- Slide under the barrier, and release your charge while aiming up at an angle.
¶ Dairon Pit Stop
- Head right, back the way you came. Pseudo-screw the remaining Ply, then head back through the firebox and into the E.M.M.I. zone.
- Running melee off of the edge, then fall down and right. You should be standing on a ledge with Green E.M.M.I. at the bottom of a pit in front of the exit. Jump over Green E.M.M.I. and immediately exit the E.M.M.I. zone.
- Head right to the dual-magnet tower. Shoot the Ply above, then wall jump on the tower, the left hand wall, off of the magnet as it moves down, off of the tower, and grab onto the top magnet. Missile the Shelmit and head down and right into the E.M.M.I. zone.
- Just as soon as you enter the EMMI zone, wall/magnet jump to the top of the room, and continue moving right, out of the EMMI zone.
- Pass through the save room, then climb onto the magnet wall above in the next room, and shoot out the blocks. Open the Charge Beam door with a spin fast-charge and enter it.
- Running melee off of the ledge, slide under the barrier, then wall jump off the left magnet wall and pull the magnet block down.
- Fall off of the magnet block, slide back under the barrier, and head right through the door.
- Shoot out the far floor blocks and move right into the next room. Pseudo-screw the Ply as you move to the top-left door.
- Head left and collect the E-tank. Then move up through the trapdoor and left to the thermal switch.
- Run left through the thermal door, then jump up at the wide-beam block and up again, now heading right. At the top of the room, begin heading left, down, and left again until you reach the train to Dairon.
¶ Wide Beam
- Head left off the train platform towards the door. Jump as you exit the door onto the magnet above, and jump up to the top ledge, moving left. Shoot through the floor and fall down to the bottom-left door.
- Move left through the save room and then head down: slide off of the door's ledge, spin fall off the edge to the left, then run-melee as you head right again. Jump over the Autsharp, then shoot two missiles into the Sharpaw, and head left to the next room.
- Jump onto the ledge in the next room, then run left along the bottom, jump up and slide through the door.
- The moment you enter the next room, jump using the coyote time the slide gave you, then head left through the door.
- Head up and over through the room. Moving at maximum speed will let you ignore the first enemy. The second enemy, at the top of the room, can be killed with two missiles. Shoot out the floor, slide into the next room, and power the generator.
- Head back through the same room to the newly powered missile door. Get past the enemy up top by melee-countering it then sliding underneath. Head through the door and collect the Wide Beam.
¶ Back to Cataris
- Shoot out the floor and head through the door.
- Coyote jump right off of the ledge to avoid falling to the very bottom. Shoot a Charge Beam, slide and missile twice to kill the Autsniper, then mash kill the Nailong.
- Charge a beam as you spin-jump to the Wide Beam Block, then open it.
- Head up to the top of the room, kill the Sharpaw, then jump left and enter the the E.M.M.I. zone.
- Shoot out the walls in the E.M.M.I. zone as you head left. Jump up to the floor above, and immediately skip the cutscene.
- Run right as you charge a beam. Release your beam just before short-hopping up the ledge, opening the door early, and head through it.
- Continue right, jumping through the shutter but over the pressure plate, and charge your beam.
- Release a fully charged shot at the Wide Beam Block as you exit the E.M.M.I. zone, then melee over the gap and continue right.
- Jump up to the Wide Beam Block in the next room, shoot it out, then continue to the train back to Cataris.
¶ Morph Ball
- Run right from the train room, shoot out and slide through the corner block. Start charging a beam as you continue down, and use it to shoot the Wide Beam Block. Head left into the E.M.M.I. zone.
- Running melee off of the ledge (and through the Autool). Destroy the Wide Beam Cover on the left and through the door, jumping immediately as you do. Jump off this ledge onto the magnet wall.
- Start charging your beam as you jump up the magnet wall. Once you reach the top, run left, release your charge, and keep shooting in order to explode the blob. Running melee off of the ledge and move into the Central Unit room.
- Defeat the Central Unit. Unload as many missiles as possible before the Rinka forces you to move left, then spam beam (+weave with turbo) to finish it off. Jumping is an easy way to dodge.
- Exit the Central Unit and confront Green E.M.M.I..
¶ Getting Varia Suit
- Move to the bottom left of the room and hole-in-one into the morph ball tunnel. Continue left until you fall out of the tunnel.
- Avoid the missile tank and head left out of the E.M.M.I. zone.
- Continue down through the Slidle tunnels. Then slide-morph-jump into the statue's mouth and move through the tunnel.
- Break the blocks into the cavity. Break the block hiding the morph tunnel, then slide through it.
- Start charging your beam the moment you unmorph, then stationary jump up into the next bug tunnels, releasing the charge rightwards to kill the bugs just spawning in.
- If you're on rookie, don't grab the Missile+ Tank, otherwise do get it.
- Take Red Teleportal into Artaria
- Head down from the Teleportal, (Ensure you avoid sliding in this room if you are attempting item tutorial skip) then move left towards the door, staying in morph to pass under the first Sunnap.
- Run through the save room. As you enter the next room, immediately jump-morph into the tunnel.
- Jump to avoid the energy part, then shoot out the Kreep and head into the top-right morph tunnel.
- Unmorph immediately, and spam beams to shoot out the two destructible blocks. Slide in, and just before falling off the ledge, morph again to clear the gap over the first divit, and jump over the second. In the next room, head up and through the next morph tunnel.
- Start climbing the next room, charging your beam as you do so. Once you reach the top, you want to both get through the morph ball tunnel and open the door beyond.
- Spin jump towards the tunnel, aim at the door through the tunnel, then morph. This will automatically release the charged shot.
- Manually unmorph after the tunnel and move through the door.
- Charge another beam as you run right. Release it at the far door just before you jump up and activate the magma switch.
- Ignore the explosions. Begin climbing the room.
- Once you round the first corner curving from right to left, shoot out the block covering the tunnel and jump-morph into it.
- Slide through the next two tunnels. Jump up the magnet wall, shoot out the blocks, and pass through the tunnel.
- As you head right, shoot out the blocks rather than sliding under. As you round the next corner, again shoot out the blocks in the tunnel and jump-morph into it.
- Slide into the next room. Climb up, shoot out the ceiling, open and pass through the missile door.
- As you run right, charge your beam. Release it at the door.
- Jump-morph into the tunnel, destroy the Item Sphere and collect the Varia Suit.
- Head right and slide through the tunnel towards the previously unlocked door.
- Shoot out the floor on the far right of the room, then begin charging your beam. As you start sliding left under the lower Autclast, release your shot at the door, then head through it.
- Move down and left in the next room. As you slide into the pit, morph.
- At the bottom, move left through the tunnel, then immediately hole-in-one into the right tunnel.
- Continue heading right, run-meleeing off of the next fall to skip one platform. Continue down through the door you unlocked earlier.
- Charge a beam as you head through the door. Shoot both the leftmost Ply and the charge beam door with it.
- Head through the door, morph down the pit, and take the Red Teleportal.
¶ Kraid and Diffusion Beam
- Slide-morph left the moment you spawn in. With correct timing, you will max-speed fall down the tunnel. Once you land, head through the right door.
- Slide into the tunnel and shoot out the blocks before you auto-morph. Then shoot out the floor and move left towards Kraid.
- Shoot out the top 2 beam blocks and jump and dash melee off of them and respin around the corner. Slide into the tunnel when you land.
- Traverse through the morph tunnel and double back left past the Obsydomithons and into the morph tunnel.
- Continue left into the bottom of the room and then proceed right across the lava pits, shoot out the Sclawk with missiles then break the beam block.
- Shoot the beam block behind the large Obsydomithon and jump over it. Break the blob behind the second one and proceed to the next room with another blob to pop.
- Drop down and dash melee across the lava pit and quick rise out of the lava
- Kill the Gobbler with a melee counter and proceed to Kraid
- After defeating Kraid, ascend the room and continue right and around to the Diffusion beam room and collect the Diffusion Beam!
- Exit the room by popping the blob with a quick charge. Pop the second blob with 2 quick charges then proceed to the Purple Teleportal.
¶ Dairon 2
- Pop the blob with a diffusion shot, drop down, then jump-morph into the tunnel, and shoot out the Wide Beam Cover. Jump-morph through the first two tunnels in the next room, then head left.
- Continue left through the next room and through the Network Station. Jump-morph the tunnel, jump again over the Armadigger, then wall jump-morph through the tunnel and head into the E.M.M.I. zone.
¶ Exit EMMI Zone
- Short-hop up the first ledge. Shoot out the blocks then begin climbing up to the magnet wall.
- Both at the start of the climb and near the top, locate the E.M.M.I., then:
- If Yellow E.M.M.I. is near the bottom of the climb, jump off of the magnet wall, run left to the opening, then jump up.
- If Yellow E.M.M.I. is just above the magnet, you have two options:
- If you've made it up the climb near-optimally, the E.M.M.I. should still be above the magnet ceiling. As you run left past its faceplate, slide-cloak.
- Uncloak as far left as you can while still being able to jump without bonking.
- Spin jump right over the EMMI as it climbs down. It'll detect you, so you must get the upcoming single wall jump first try.
- On the magnet, before it detects you (slow down if needed), cloak and start climbing along the ceiling. Remain cloaked until it's moved away.
- Move left and jump through the gap in the ceiling, heading right and up.
- If you do Emmi Warp, the Yellow Emmi will not be spawned in yet because the introduction cutscene was skipped.
- In the next room, perform a Single Wall Jump to move vertically up.
- Head up, right, up and left, until you're at the top of the room above the power bomb tank. Running melee off of the ledge and exit the E.M.M.I. zone.
¶ Bombs
- Move left until near the end of the room. Slide-morph to hole-in-one into the tunnel. Manually unmorph and continue left.
- Immediately jump up, mantling into the morph gap. Continue climbing the room, charging a beam.
- Release your charge and spam beam/missile to kill the Armadiggers, move left through the door.
- Pass through the map room, and in the room after slide-morph off of the ledge.
- At the bottom of the room, head right, slide-jump onto the magnet, and climb it to the ledge above. Jump up via the ledge on the left and move through the door on the right.
- Jump up to the power platform, take aim, and start mashing beam at the blob on the wall. You should ideally destroy the block before the cutscene plays.
- Charge a charge shot while pasing through the map room
- Mantle into the 1 block hole in the left side of the wall while holding your beam
- Climb out and charge your beam and perform a pause buffered turnaround pseudo aiming at approximately a 5:30 angle to pop the blob
- Drop down into the generator room
- Destroy the blob while standing on the generator platform
- Do a DT Slide Pseudo, shooting your charge beam at approximately a 30 Degree Angle to damage the blob off the screen
- Do additional DT Slide pseudos with missile, aiming at approximately the same angle. You will be able to hear your missiles hitting the blob off screen.
- If your missiles hit the wall your timing needs adjusting
- If your missiles pseudo, but miss the blob then your angle needs to be adjusted
- The correct angle is the lowest angle that allows your missiles to still pseudo
- Climb into the morph tunnel and jump up to the generator platform to turn the power on.
- Slide-morph off of the ledge, and move through the hole you opened by destroying the blob.
- Manually unmorph and move through the Armadiggers in the same way as before.
- At the top of the room, jump-morph into the tunnel. Make sure you hold jump to max height.
- Destroy the Missile Cover, head through and collect Bombs.
¶ Enter Burenia
- Bomb out the floor, making sure you're unmorphed as they explode. Bomb out the next bock, slide in to bomb out the second, then slide-morph through the tunnel into the morph ball launcher. Bomb and get launched.
- After exiting the launcher, running melee left immediately upon touching the ground. Respin and fall to the bottom -left of the room, and head through the left door.
- Slide almost immediately off of the ledge as you enter the room. Slide-morph-jump into the launcher and take it into the next room.
- Run left through the Z-57 corpse room. In the room after, spin fall down, morphing as you hit the floor. Jump into the launcher and take it to the next room.
- In this room, avoid sliding to continue the item tutorial skip. Take the bottom-right launcher.
- Enter the E.M.M.I. zone, and wind down through the room until you reach the bottom-left door.
- In the next room, Slide under the platform, fall down, and continue left. Slide through the next tunnel, then jump up to the top-left door and exit the E.M.M.I. zone.
- Coyote jump over the pool of water in the next room, then melee off of the edge. Slide-morph through the tunnel, staying morphed as you pass under the Dredhed.
- Slide-fall off of the next edge and hole-in-one into the morph ball tunnel just above the water. Move left to the door, and take the tram to Burenia.
¶ Burenia
- Head left through the door, slide-morph off of the edge, and when you near the bottom, start laying bombs. Do this high enough and the Rodotuk will eat a bomb instead of Samus. Unmorph after the tunnel, shoot out the floor and run left and off the platform, morphing and heading right as you enter the water.
- Morph-jump right through the water. Follow the path down, unmorph and missile the Rodotuk, and slide-morph over the pit to continue left.
- Unmorph, and as you head left missile the Rodotuk. Jump-morph and let the other Rodotuk above carry you up. Bomb at the right time to kill it, then unmorph and move left.
- Missile the two Rodotuks before entering the first morph tunnel up. When entering this tunnel, spin jump off of the ledge and mid-air morph to avoid mantling.
- Jump-morph into the next tunnel. If you missed the enemy from below, bomb it now. Jump-morph into the final tunnel.
- Once out of the water, head left through the door.
- Slide-cloak just after entering the next room to avoid aggroing the Armored Shelmit, then run left (aiming down-left to avoid colliding with the Nailong), jump up to the ledge, and jump-morph into the tunnel. Once you exit the other end, jump up and run left all the way to the door.
- Talk to Adam if you didn't do Adam Save Skip
- Otherwise, run straight through.
¶ Flash Shift
- Move left, running melee the Daivo, and morph-fall down to just left of the water at the bottom of the room.
- Slide under the enemy and coyote jump to the other side of the water, ideally without grabbing the ledge. Head thrugh the door.
- In the next room, running melee off of the ledge just before the water, and morph before walking off the ledge underwater to get a boost.
- Jump-morph into the tunnel. Stay in morph for the first fall, but slide through all the others.
- When you exit the morph tunnels, running melee off the ledge to minimise the time Samus is in the water. Jump through the water and onto the platform in the middle, then running melee over the next pool. Mantle into the morph tunnel.
- Fall after you exit the tunnel, begin jumping right through the water, and charge your beam. Kill the higher Nailong, spin-fall left and mash out the leftmost one. As you fall down the next bend to the right, charge and release a shot at the Sharpaw, then coyote jump over to the shutter.
- Perform Backdoor Flash and obtain Flash Shift.
¶ Back to Dairon
- Fast climb the ledge and Flash Shift over the Shutter.
- Head to the upper Shutter, avoiding or killing the Nailongs.
- Collect the extra Energy Tank if you want.
- On your way in through the next room, spin fall down to the water then melee the Batalloon out of the way and morph near the ledge to get a boost, unmorph and jump over the Slidles.
(etc)
If there's a divergence in the route, render it with a tab. Keep in mind that anything you put in a tab will not end up in the table of contents so you always want to put a tab block under some sort of header.
- When you enter the next room, flash shift to the water and navigate to the two blobs at the bottom of the room and break each one.
- Quickly navigate to the center of the room and set up a Water Bomb Jump to jump up to the yellow platform.
- Go to the bottom left corner of the first part of the water room above the Missile Tank.
- Push against the wall and shoot to push Samus slightly away from the wall and charge a charge beam
- Crouch and free aim the charge shot at Samus's back foot
- Morph to shoot through the ceiling and hit the blob. Recharge your beam and shoot again to pop blob one.
- Navigate to the right corner next to the Batalloon and press against the wall, crouch and turnaround while holding a charge beam.
- Pause and hold about a 5:30 angle and Free Aim then unpause to shoot the blob.
- Repeat the previous two steps to pop the blob
- Store a Water Bomb Jump while the water is draining and then Water Bomb Jump across the gap to the yellow platform.
- Do a backflash slide as you enter the room. Morph and navigate to the the two blobs.
- Break both with bombs without unmorphing and morph ball jump facing left and unmorph to Ledge Warp back up and move to the yellow platform to cross the water.
- Break the blob with a charge shot and return to Dairon to acquire speedbooster.
¶ Dairon 3
¶ Speed Booster
- Quickly navigate to the Central Unit room.
- Defeat Central Unit and Yellow EMMI. Acquiring speedbooster.
¶ Return to Artaria
- Charge your speedboost and speedkeep to the platform below missile+ tank and wall jump up to the EMMI door leading back towards the ADAM room.
- Finish the speedboost puzzle and grab the energy tank if you wish.
- Drop down to the door leading back towards the ADAM Station and navigate right through the hot rooms to the Dairon/Artaria Elevator
- You may grab the powerbomb tank in this room if you wish to make escape easier.
- Finish the speedboost puzzle and grab the energy tank if you wish.
- Return to Artaria by elevator.
¶ Artaria 2
¶ Grapple Beam
- Drop down the grapple tower and move right through the door.
- You can charge another shinespark and set up a bomuhey skew on the small platform below
- kill the Dropter on the way and grab grapple beam.
¶ Screw Attack
If there's a divergence in the route, render it with a tab. Keep in mind that anything you put in a tab will not end up in the table of contents so you always want to put a tab block under some sort of header.
- Re-enter emmi zone and go down and left towards the big room.
- You may opt to use the runway into the EMMI zone to get skew on the platform below with the morph tunnel and the Infester.
- Flash shift across the big empty room and store a shinespark on the long hallway. Exit the EMMI zone through the EMMI door and shinespark across the water pit.
- Open the power beam doors, charge another shinespark. Morph and drop to the third slope. Unmorph and spark to the slope to reset the spark timer.
- Go into the water and do a water skew. Spark up, jump to the flipper, melee once, charge a shinespark holding left, break skew with an aim back (right) melee and spark left.
- Alternatively, if you do not wish to water skew, you can do a modified left side clip on the flipper by resetting your skew angle by morphing, unmorphing facing left (towards the flipper), crouch, turnaround once while crouched and perform a perfect back skew. Perform a left side clip with this angle and shinespark through the flipper.
- DT Slide pseudo grapple the grapple block. Do a skew to charge a shinespark and do a Shinesink clip on the right side of the room or an Aim Down Clip into the morph tunnel below the Blue Teleportal.
- Obtain Screw Attack and be careful not to lose skew on the way down.
- Navigate down and to the right under the Yellow Teleportal from the Grapple EMMI door then double back left and through the hall way into the Artaria Big Room. Exit the big room through the bottom where you did Water Platform Skip and exit the EMMI Zone.
- Continue left through the small freezer room, up the Artaria Speedway and through the big Freezer and into the grapple door.
- Run through the room and touch the blob wall underwater. Melee pseudo the blob. Water bomb jump up the left wall.
- Do a perfect skew and charge the shinespark. Jump into the water, spark up to the small area aside the missile tank and go through the tunnel, moving toward another water area. Water bomb jump after dropping through the collapsible block on the other side and obtaining Screw Attack.
- You can do a forward skew. Then speedboost at the small area and speedkeep before going into water. store the spark, spark upright as you reach the other side.
¶ Return to Red Teleporter
- Wall jump up and trigger the flipper. Landing on the platform with recharge station. charge a shinespark with skew.
- Do a water forward skew and spark up. Charge another shinespark, jump to the right. Shot a beam shot midair to cancel screw attack while flicking your stick down to store the spark.
- Melee three times to the left, break skew and spark right.
- If you can do a Neutral Jump Clip that is a harder but slightly faster option
- Morph pseudo the flipper blob and use skew to charge a shinespark to climb the room.
- Go to the red teleportal and return to Cataris.
- you can take a longer route for safety. After trigger the flipper. Go into the water and water bomb jump up. Return to the big room in emmi zone, go left and return to waterass.
¶ Cataris 2
¶ Orange Teleporter
- morph into the tunnel, destroy the bomb blocks and climb up, enter the heat room.
- Two flash shifts then fire grapple up.
- Break the hidden block and enter Ghavoran.
¶ Ghavoran
¶ Entering Hanubia
- Move to the bottom. Bomb the block and do a perfect skew facing forward.
- Morph and unmorph at the end of the slope, jump and walljump to keep the speedboost to instantkill the Gobbler.
- Enter the room, go the the right door and do mini tornadoes again to clip the one-way door with a grapple walk.
- you can Shinesink Clip or Aim Down Clip into Golzuna's room and finish the cross bomb puzzle if you wish (slower) with Flash Shift Cross Bomb Skip. Use shinesparks stored from a skew to spark over the collapsible blocks otherwise.
- Break the screw blocks and ride the transport to Hanubia.
¶ Hanubia
¶ Power Bomb
- Go the the top beam door in the Adam room and do another set of mini tornadoes to clip the one way door. Perform a Neutral Jump Clip clip into the second door to trigger the Hanubia Metroid Powers cutscene.
- You can grab the power bomb tank in the speedboost puzzle if you wish to make escape more comfortable.
- Perform the Power Bomb Wall Clip.
- To fight the Chozo Warrior, get a perfect skew and build a shinespark to spark and instantly defeat its shield phase. Mash beams and dodge its attacks to defeat Phase 2.
¶ Finishing RBX
- Blast the power bomb blocks and the tunnel above, refill your power bomb ammo from autool or the refill station.
- Perform the RBX Sink using an Aim Down Clip.
- Use the right wall and walk forward and flick down at the tile after the recharge station where the tiles change color
- Fire your grapple about 30 degrees above horizontal to drop down into the escape area safely
- Clip the two tile power bomb wall by either clipping little continuosly using morph ball or do a melee-buffered grapple walk when samus is next to the wall. Place a powerbomb to blow up any blocks in the first room.
- you can place a power bomb before clipping into it to save time.
- Place another power bomb to destroy the power bomb walls in the next room and enter rbx fight.
- Mash beams through RBX, optionally you may opt to stop mashing and charge your beam to fire it and mash again when the camera scrolls about half way up Samus's calf. Just ensure RBX takes damage for a few seconds.
¶ Escape
If you didn't die in Hanubia for once. The blasted tunnel in the long column still remains a oob check. Watch the shinespark cutscene or spark up just below the checkbox to avoid dying.
Try to maintain skew through escape to not lose excessive time, it's required to clip the last door.
- After killing RBX, charge a shinespark to spark up and flash left to the ground.
- Face left prior to sparking or hold Free Aim while you spark to prevent Samus from doing an automatic mid air turnaround and losing skew.
- Bomb Jump once and flash left to clear the slope.
- Continue your way to the room with bomb blocks.
- charge a speedboost with the help of Rodotuk. ADC down.
- you can head left through the EMMI door to do several left door clips (faster) or go to the lower route.
- you can also not charge a speedboost. Instead continue, clip the left closed beam door and clip down to reach Adam room.
- If you go to the lower route, you must drop a power bombs at the marked locations:
- If you do not want to have to farm for Powerbombs during escape, you must have a total powerbomb count of 4 prior to RBX (obtain 2 tanks).
- Do a left clip to clip the hyper beam door. Escape and finish the run.
¶ Storm skip
Much slower route but requires less wall clipping. Has some optional clips that function as shortcuts.
- As you enter Hanubia, go down, kill the big robot. Do a slide pseudo grapple and ride the elevator to Ferenia.
- Take a pitstop at space jump on the way down to the EMMI zone by Aim Down Clipping into the room with the Chozo Statue.
- Navigate out through the Space Jump Pool and back to the Ferenia Robo Arena.
- Drop down to the bottom left door and continue to descend towards the EMMI zone
- As a short cut, you can Neutral Jump Clip + Spark or do a DLC Clip with Map Buffer on the right side of the Robo Arena to the right of the shutter door to skip into the room with the storm missile lock.
- Grapple up over the water and flash across the room around the robots then drop down into the water to enter through the door. Grapple across the water using the ceiling magnets to exit the room.
- Break the bomb blocks outside the EMMI Zone and proceed to upper EMMI zone door.
- If you need to re-obtain skew, exit the EMMI zone out the top left door and use that walkway back into the EMMI zone to charge a shinespark then use the ledge across from the door to achieve skew state.
- Navigate your way to the big room under the freezer. Do a grapple ceiling clip with the grapple ceiling above and start clipping the closed beam door at the top right of the room.
- Once you grapple walk through the door, climb the room and go through the morph tunnel towards the Purple EMMI Arena.
- Continue and drop into the water. Out of Water Bomb Jump at the highest platform out of the water. Break the robot beforehand if you wish. Break the blobs, do a perfect skew to charge a shinespark. Morph, drop into water, break the blob and spark up
- You must charge a shinespark before going into the water and spark upright at the next platform.
If you lose skew or don't charge a shinespark before dropping down into the water on the right
side of the room you must reset to check point to escape and repeat the door clip.
- Defeat Central Unit and Purple EMMI. Grabbing wave beam, return to Hanubia to fight red chozo soldier.
- Fight the Elite Chozo then ascend to Itorash
- Defeat Ravenbeak
- Escape ZDR
¶ Screw Skip
A slightly more advanced route with additional clips that still fights Ravenbeak and is slightly faster than Storm Skip.
- Follow the Any % Unrestricted Guide up to Speed Booster except, do Early Grapple Beam in Dairon 2 like in Any % NMG.
- Take Grapple Beam shortcuts available to you in Dairon 2 and Burenia.
- Instead of going towards the Dairon-Artaria Elevator, ballspark up the speed puzzle, collect the Energy Tank if you wish and head right
- Single wall jump off of the right wall or flash chain up to the walkway with the ceiling magnets
- Get Skew off of the ledge above the walk way, there's ample room to store a spark below.
- Perform the Backdoor Ferenia clip using a Magnet Skew and a Map Buffered Shinespark to skip the wide beam block. You may also Neutral Jump Clip + Map Buffered Spark if you wish.
- Take the elevator to Ferenia
- Perform Backdoor Space Clips and collect Space Jump
- Follow the Storm Skip Routing until Hanubia.
- Perform Backdoor Hanubia Clip
- Follow Storm Skip to the end
- Note, this route skips Screw Attack, so you will need to use the hyper beam to destroy screw blocks in escape.
¶ Emmi Boost Artaria Routing
Instead of fighting Corpius after Early Cloak Pseudo, you can head into the EMMI zone and boost off of the EMMI to reach the door at the top left of the White EMMI intro room. If you parry the EMMI afterwards, you can continue on to Charge Beam
- Following Early Cloak Pseudo Wave, head left into the EMMI Zone and slide into the door to Coyote Jump over to the top of the room and jump over the Missile tank, drop down and trigger the White EMMI Intro Cutscene.
- Pop the blob and head to the top of the room and position Samus so she is standing just to the right of the white box in the background
- Wait for the EMMI to get close to samus (about 1 step away) and Neutral jump and respin over the EMMI, it should climb onto the corner of the ceiling
- Coyote Jump off the ledge when the EMMI has climbed back around the corner of the ceiling and perform a minimum height wall jump while holding left then buffer a max height wall jump while the stick is neutral to wall jump facing right.
- You may opt to tap Free Aim and Re-spin to preserve more height over just wall jumping and holding left.
- Melee quickly after the wall jump similar to Water Platform Skip to boost off the EMMI to the left and grab the ledge by holding left.
- Wait for the EMMI to climb into the door frame and do a Spin Jump over the EMMI from the ledge as it rears its head back.
- Samus will clear the EMMI and enter a partially loaded version of the long hall way.
- Stand on the ledge at the beginning of the room and jump into the EMMI to trigger an EMMI Parry sequence.
- Parry the EMMI and exit out left down into the Big Room and perform Water Platform Skip to continue onto Charge Beam.
- Head straight to Corpius then the Thermal Switch and finally the White Emmi.
- Exit Artaria and proceed to Cataris.
- Doing this routing allows you to skip ADAM Skip in Cataris by pairing it with Seam Psedo and EMMI Warp.
- If you are not getting to the ledge after bumping the EMMI, ensure your Coyote Jump is as late as possible and you hold B the entire jump prior to the first wall jump.
- If you bump the Emmi while jumping over it, adjust your timing to when the EMMI is completely reared back.
¶ EMMI Warp + Seam Pseudo
¶ Seam Pseudo
A means of pseudo wave beam by shooting missiles right after pressing Free Aim between hard and soft collision to reach blobs that are otherwise unreachable.
- After the Green EMMI intro, run left and do a maximum height spin jump into the corner and buffer a slide to the left while falling.
- Take two steps to the right, Samus's foot should roughly align with the bolt on the floor
- Jump and press and hold free aim near the ceiling and quickly tap up and to the left at approximately an 11 o'clock or 120 Degree angle and fire a missile to hit the blob.
- After the blob is popped, ride the magnet rail across and proceed either through the cloak door if you did an Emmi Boost in Artaria or up and around to perform ADAM Skip.
- If you go left through the cloak door, once you arrive at the room with the magnet rails and Plys, its possible to Cloak Jump off of the slope on the left side and damage boost off the Ply onto the magnet rail, however you may opt to just take the rails as normal.
- After you pass through the ADAM room in northwest Cataris, prepare for Emmi Warp.
- If your missile is hitting the ceiling (explosion is to the right of the seam), your timing of the shot needs adjustment
- If your missile is exploding inside of collision or pseudoing and missing the blob, your angle needs adjustment
¶ Green EMMI Warp
A trick that doesn't require bomuhey skew to warp samus and EMMI to the execution room. Achieving early morph in single file but requires more rng luck on EMMI's warp spawn.
See Tricks pages for EMMI Warp
¶ Multi-File
This category involves runners to exit the running file and entering other files. Mainly getting Bomuhey skew state for early morph ball and varia skip.
¶ Early Morph Ball
- Save at the first Cataris Adam room and set up bomuhey skew in other file.
- Continue the run and into the emmi zone, run left until under the blob wall.
- Do a perfect forward skew, presudo beam the blob and ride the movable magnet celling.
- Alternatively, you can Seam Pseudo the blob with missiles.
- You can either continue your way to upper left Adam room or doing ADAM Save Skip.
- continue your way to the upper left area .
- do a ledge drop skew or hobbit skew, go to the wall next to the EMMI tunnel.
- melee 5 times, cancel skew, turn samus facing the wall, perform a map buffer.
- Once enter the tunnel, do a hobbit skew and melee 2 times. Now lure EMMI to catch samus to warp both to the other room.
- Counter EMMI and climb up to the blob wall, slide presudo wave to destroy for the EMMI quick kill.
- Navigate your way to the magnet wall in the lava room
- you can either do two map buffer clips to save health or yolo it.
- exit the room and do a map buffer clip, grab the etank, interact the heat device.
- When the controls are back, reload checkpoint and run to Dairon to grab wide beam.
¶ Varia Skip
As the name implies, skipping varia suit. Allow getting bomb just after acquire wide beam without having varia suit to travel the heat room below.
- After getting morph ball, go left, enter the tunnel, slide left and return to right unlocked beam door.
- Climb up the room and proceed forward into Transport to Dairon.
- Enter Dairon.
- Head left, jump into the ledge and keep moving till the save room. Save, get bomuhey skew and reload the run file.
- Climb up the ledge and skew a slightly left angle
- Enter the EMMI zone and jump into the EMMI door. If there is a quick screen and you're still in the EMMI zone. You delete Yellow EMMI existence from now.
- Continue your way to the left. Slide-morph and jump to not trigger the pressure valve.
- Go all the way out of the morph tunnel. Then go right. enter the morph tunnel and go right.
- slide morph jump to avoid triggering the pressure valve. Go into the morph tunnel. Climb up and continue right.
- Grab the magnet wall, break the hidden blocks and open the charge beam door.
- Quickly grab the magnet wall in the lava room and get out. Do a DLC skew or Hobbit skew, clip the right wall. Move left, grab the etank and activate the heat transport machine.
- Reload checkpoint and run towards the transport to Dairon.
- Once you enter Dairon, grab wide beam same as the route above without losing skew.
- Continue the route until entering EMMI zone.
- (proceed right, save and set up Bomuhey skew in other file if you lose skew.)
- Grab the ledge and do a ledge drop skew.
- Jump to the left wall. Right Melee and slide left to clip the EMMI valve. Morph when samus' right leg pass the line on the floor tile.
- You may also do a left side clip to get into the wall instead. If you chose to left side clip, unskew and slide into the EMMI tunnel.
- Drop down. Perform hobbit skew. Jump right and continue countering to the left. About 22 counters or samus' green light on the foot fully pass the floor tile line. Morph and roll left.
¶ Resources
¶ Closing Comments
¶ Contributors
Wimac